Categories
Decor

Turning Old Windows into Eco-Friendly Wall Art

Repurposed Window Art That Warms Your Home

I still remember hauling a rattly old window from the curb with my neighbor Lisa while the kids were at soccer practice. At forty-two, juggling carpools, homework and dinner plans feels like a craft all its own, and my two kids—an imaginative twelve-year-old who paints everything and an eight-year-old who insists on measuring the sky—love when I turn those curbside finds into something useful. On slow Saturday mornings I sip coffee by the kitchen table, watching them sketch, and I think about how a single pane can hold a memory, brighten a hallway, or act as a quiet reminder of simpler days. That sense of warmth and making-do naturally led me to experiment with windows as decorative pieces. If you love cozy, practical ideas that speak to family life, these creative swaps offer fresh home décor ideas and decorating inspiration you can actually live with.

Stained-Glass Style Window Panels

Turn a plain pane into a jewel-like focal point with glass paint or faux stained glass film. Visually, the colored light casts a soft, comforting glow that makes a room feel both handcrafted and polished. Emotionally, it becomes a keepsake—my daughter traces a sunbeam on lazy afternoons and remembers helping mix colors. To do it at home, clean the pane thoroughly, sketch a simple design on paper, and use liquid leading and translucent glass paints for a forgiving, durable finish. You can also cut film to size for a no-mess option that peels on and off.

Place the finished window in a bright hallway or hang it on an exterior-facing wall to catch the morning light. This kind of interior styling tip works well with casual family routines because it tolerates smudges and little fingerprints while still feeling intentional.

Framed Photo Collage Window

Repurpose the panes as a multi-photo frame that feels nostalgic without crowding walls. A grid of family photos behind each pane tells a visual story; neighbors and visiting grandparents always linger longer when they spot a familiar face. Start by measuring each pane and printing photos slightly smaller so they sit neatly behind the glass. Use archival tape or small photo corners so images can be updated.

Lean the window on a console table in the entryway or secure it to the wall above a bench where kids drop backpacks. This approach to decorating inspiration blends practicality with sentiment—the kids like rotating seasonal school photos, and it doubles as a gentle way to teach them about memory and storytelling.

Mini Indoor Garden Window Planter

Transform a window into a living tableau by installing slim planter boxes across the lower panes. A line of herbs or succulents brightens a kitchen and invites little helpers to water plants after homework, turning chores into family time. Visually, the green textures contrast beautifully with the glass and frame, adding depth and a sense of life.

Mount lightweight cedar boxes or repurposed tins with secure brackets, use well-draining soil, and choose low-maintenance plants if schedules are busy. This interior styling tip brings nature inside without taking over the space, and kids delight in snipping basil for pasta or checking how fast mint grows after a weekend rain.

Chalkboard Message Window

Flip a pane into a writable family command center with chalkboard paint. It becomes a cozy hub where reminders, grocery lists and sibling jokes live side by side. The black matte surface is practical and approachable, visually grounding a gallery wall or adding a rustic touch above a coat rack.

Paint the back of the pane with two coats of chalkboard paint, frame it in a central household spot, and keep a small jar of chalk nearby. My kids love leaving notes to each other—little drawings that make me smile when I find them in the morning—and it’s a flexible decorating idea that grows with your family’s routines.

Mirror Mosaic for Light and Space

Break a few panes into carefully trimmed pieces and create a mirrored mosaic that amplifies light in darker corners. Reflective surfaces make rooms feel larger and add a playful glint that children and guests notice. Emotionally, a mirror art piece can become a conversation starter, a little theatrical flourish for everyday life.

For safety, score and snap glass with gloves and eye protection, adhere pieces to a plywood backing with clear adhesive, and seal the edges. Hang it across from a window to redistribute sunlight, or lean it behind a bookshelf for a whimsical peek-through effect. This decorating approach is surprisingly forgiving—perfect for busy homes that benefit from clever interior styling tips.

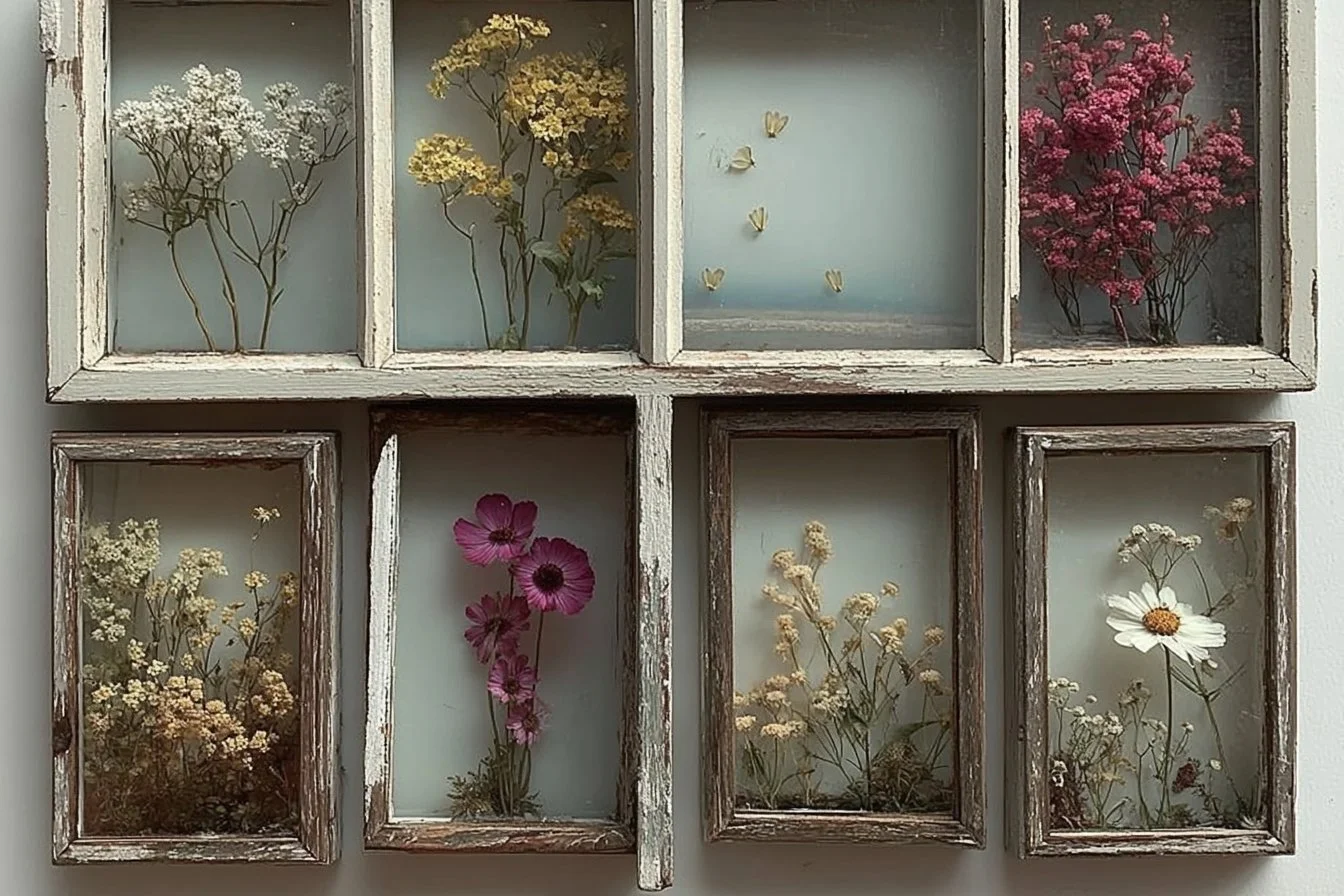
Story Window: Rotating Keepsake Display

Use the panes to create a rotating gallery of seasonal crafts, school projects and small mementos. Each pane becomes a curated vignette—a child’s watercolor, a pressed flower from a backyard walk, a ribbon from a race—bringing a gentle rhythm to your decor. Visually, the compartmentalized display keeps the room feeling organized; emotionally, it honors everyday moments.

Mount the window with removable clips so you can swap items without fuss. The kids love choosing what goes in their pane each week, and it encourages daily creativity that’s easy to showcase. This style of home décor idea is practical, heartwarming, and invites guests to linger and learn about your family through small, meaningful objects.

Conclusion

If you want more step-by-step inspiration on turning panes into colorful art, this How to make Stained Glass Art from Old Window | Hometalk tutorial is a great place to start. Try one project at a time, involve the kids, and save the ideas that feel right—these small changes add personality and purpose to your rooms while fitting smoothly into your family’s everyday life. For anyone looking for approachable interior styling tips and lasting decorating inspiration, repurposed windows are one of those projects that reward patience, creativity, and a little bit of elbow grease.

Categories
Decor

Charming Wood Wall Displays for Every Kitchen

I still remember the Saturday morning when my youngest decided the living room was the perfect place for a fort, blankets draped over dining chairs while I brewed coffee and watched the neighborhood kids pedal by. With two kids between eight and twelve, weekdays are a shuffle of school lunches, soccer practice, and the little rituals that make home feel lived in. Neighbors drop off baked goods, we swap carpool stories, and I keep a running list of quick projects that make our kitchen feel calmer. Crafting corners and easy decor swaps have become my secret weapons. Between homework station adjustments and sneaking in a bit of styling while the kids set the table, small changes to our walls make a big difference. When the kids want a quick craft, I usually pull up a guide to making 3D cardboard stars for inspiration, and those little projects often spark the decorating inspiration I need for the next cozy kitchen refresh.

Layered Wood Display: Mix Sizes for Depth

A layered arrangement of different board sizes creates an inviting focal point that reads warm and collected. Start with a large, well-worn board as the anchor and add smaller, contrasting pieces offset at slight angles. Visually, the mix of grain patterns and tones adds texture without feeling busy, which is perfect for a family kitchen where crumbs and homework notes coexist. Emotionally, it feels like a curated collection of moments—each board could be a memory from a market find or a hand-me-down from a neighbor. To apply this at home, pick a wall near the breakfast nook and arrange the boards on the floor first until the composition sings. Use removable wall hooks for easy switching, so you can rotate pieces after a craft day with the kids or rearrange for a fresh look before hosting. This technique pairs well with simple interior styling tips like keeping countertops clutter-free so the wall can breathe.

Hanging Boards with Beautiful Hooks and Strings

Hanging boards by hooks and natural twine turns everyday kitchen tools into art. Choose a line of antique-style hooks or modern brass pegs and suspend boards at slightly different heights for a casual, lived-in feel. This method works visually because the negative space between boards highlights each piece’s unique edge and texture, adding rhythm to the wall. It also feels homey—my daughter loves helping me choose which board to hang each week, and it becomes a family ritual. Practically, use screw-in hooks into studs for heavier boards, or strong wall anchors for lighter ones. If you enjoy little DIY accents, combining this display with a DIY 3D cardboard stars tutorial on a nearby shelf can add playful, kid-friendly charm. This styling approach blends functionality and decor, doubling as easy-access serving boards for weekend breakfasts.

Mosaic Back-splash of Small Boards

Create a mosaic by arranging many small boards into a patchwork above a prep area or coffee station. The key to this look is variation—mix oak, maple, and walnut tones, include a painted board or two, and offset grain directions for visual interest. Emotionally it reads like a handcrafted quilt for the wall, which resonates when you want your kitchen to feel nurturing and warm. To pull this off, measure the space and lay the pattern on the floor before attaching anything; using adhesive strips for lighter pieces can be a renter-friendly option. This layout also hides small scuffs and is forgiving when life happens—crayon marks or accidental drips become part of the story. It’s an approachable interior styling tip that elevates a utilitarian area into a place you actually want to linger, and kids often enjoy selecting which piece goes where, turning a decor refresh into family time.

Framed Board Art for a Polished Look

Turning choice boards into framed wall art makes a bold, refined statement while keeping warmth at the center. Select two or three boards with compelling grain or color, trim or mount them inside simple shadowbox frames, and space them evenly on a dining wall. This works visually because the frames introduce negative space and symmetry, balancing the organic wood texture with crisp lines. For a busy household, framed pieces feel tidy and intentional, giving you a grown-up gallery that still nods to home life. To make it doable, have the kids help decide which boards to frame as a weekend project—framing can be a great way to preserve a board with sentimental value, like one used to present a graduation cake or holiday bake. Framed wood also pairs beautifully with other home décor ideas like floating shelves or a hanging herb basket, creating a layered, styled vignette.

Rotating Shelf Display for Seasonal and Kid-Made Pieces

A slim floating shelf or narrow picture ledge makes rotating boards simple and fun. Place a mix of boards leaning against the wall—add a chalkboard board for notes or a small piece painted by your child to bring in a personal touch. This method works emotionally because it keeps the wall dynamic and allows the family to leave little messages or swap pieces after a creative afternoon. Practically, choose a sturdy ledge and secure it into studs, then arrange boards overlapping slightly so each piece peeks through. It’s an ideal spot for a rotating display: holiday breads, weekend charcuterie, or the kids’ latest painted experiment all look intentional when propped here. This flexible approach also supports decorating inspiration by letting you test combinations without committing to holes in the wall, which is great in rental homes or when you crave frequent updates.

Functional Beauty: Boards as Serving and Storage

Use boards not only as wall decor but as quick-access serving pieces and storage. Mount a few boards near the oven or counter with hooks or a simple rail so you can grab them mid-recipe or use them for impromptu snack spreads when neighbors drop by. Visually, grouping utilitarian pieces signals hospitality and makes the kitchen feel welcoming. Emotionally, it’s practical love—when guests arrive, you can pull down a board, arrange cheese and fruit, and still feel like the host who planned ahead. To implement this, choose boards with comfortable handles and finish them with food-safe oil, and rotate their placement so the kids help set the table from the wall display. This approach blends decorating inspiration with real-life function, making the kitchen beautiful and genuinely useful for family routines.

Conclusion

If you enjoyed these interior styling tips and want more budget-friendly collage ideas to spark your next project, check out this helpful resource for creating mood boards and wall collages: budget-friendly mood board collage ideas. Save a few of the displays you love, try one small change this weekend, and come back when you want fresh decorating inspiration—your kitchen will thank you and the kids will probably have a new craft to add to the lineup.