Categories
Kitchen

Warm Natural Kitchens That Feel Like Home

I still remember the morning my youngest climbed into a sunlit stool to stir pancake batter while the neighbor’s golden retriever snoozed under the table. Between school drop-offs, soccer practice, and Saturday playdates, my kitchen became more than a cooking space; it was a living room with a stove. I started noticing the ways our family gravitated toward warmth and texture—the worn wooden cutting board, a favorite linen towel, a potted basil plant with sticky little hands learning to water it. Those small comforts pushed me to rework our space into something that felt calm and practical. Over time I learned how subtle design choices can hold a household together: gentle wood tones, tactile textiles, and a little greenery make daily routines feel intentional and cozy without extra fuss.

Natural Wood Cabinets for Lasting Warmth

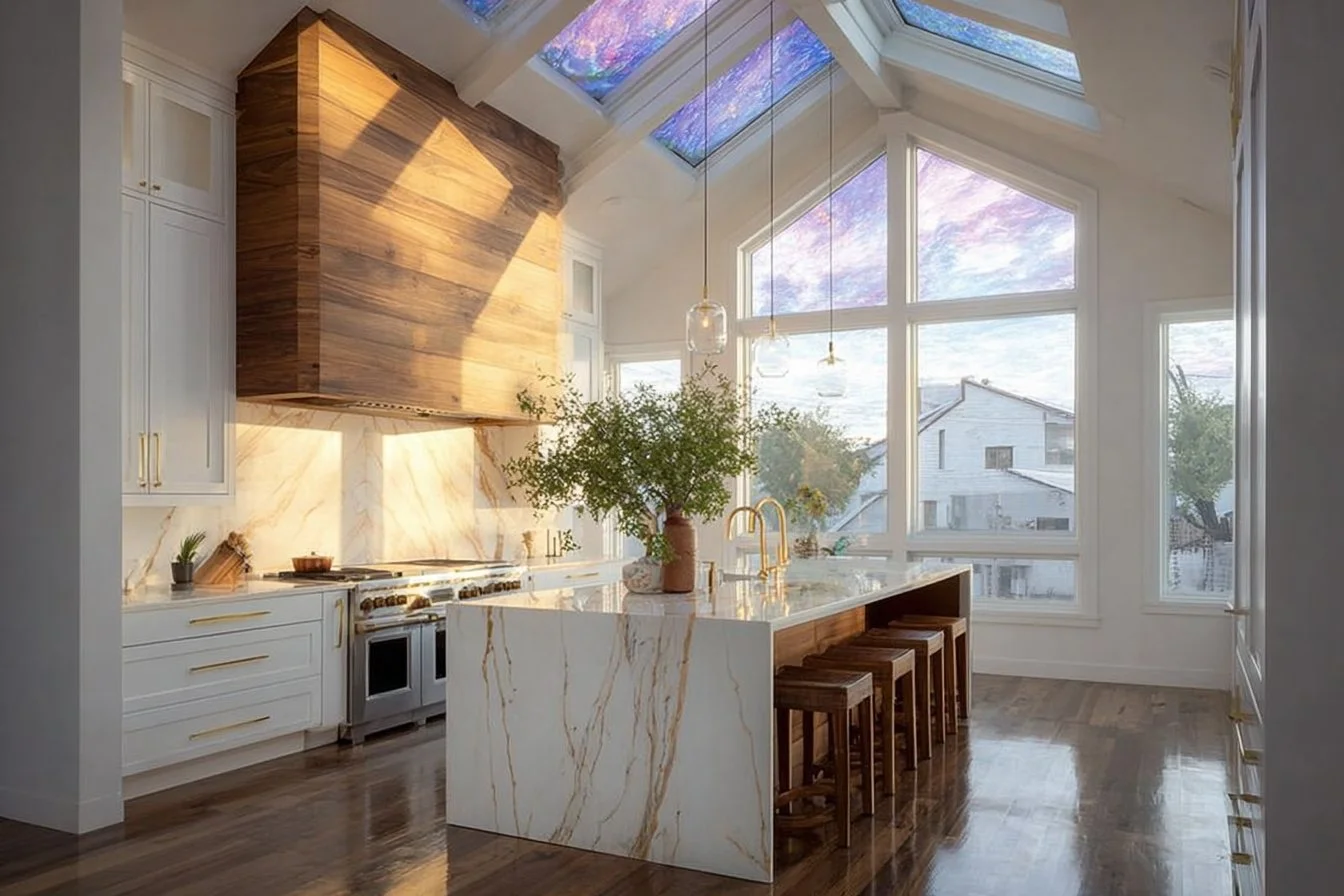
Choosing real wood or wood-look cabinetry instantly grounds a kitchen and gives it a lived-in, welcoming vibe. Visually, warm grains add depth and soften the sharp lines common in modern design. Emotionally, families respond to wood because it feels familiar and less precious—perfect for kids who bring art projects and snacks to the counter. To apply this at home, start with one focal run of lower cabinets in a walnut or oak tone while keeping uppers light to maintain brightness. Mix matte finishes so fingerprints are less obvious, and add simple brass or matte black pulls for modern contrast. For practical family life, choose durable finishes and soft-close drawers so little fingers stay safe and cleanup is fast after weekday dinners.

Stone Surfaces and Earthy Backslashes

Natural stone and textured backsplashes create an organic anchor that reads both modern and timeless. A honed quartzite or soapstone counter delivers visual interest without glossy glare, making spills less obvious and cleanup easier. Emotionally, these materials feel rooted—like the kitchen has history—so everyday moments like homework on the island feel more meaningful. To bring this idea home, pick a neutral-toned countertop and extend the backsplash partially up the wall in a complementary texture. Keep grout minimal and choose sealed stones or low-maintenance engineered options if you need durability for a busy family. This way you get the aesthetic of nature with the resilience required for school lunch rushes and weekend baking days.

Indoor Herb Nook for Life and Flavor

A tiny indoor herb garden near a sunny window adds color, scent, and a sense of growth that resonates with family life. Visually, trailing leaves soften hard surfaces and introduce seasonal change without a full remodel. Emotionally, kids love tending plants, learning responsibility while plucking basil for pasta. To implement this, dedicate a shallow shelf or corner of your counter to a trio of herbs in matching pots—rosemary, basil, and thyme are forgiving starters. Use a simple drip tray for easy watering and teach the kids a nightly routine to check the soil. This small habit ties into interior styling tips by layering living elements with functional tools like a mortar and pestle or wooden spoons displayed nearby.

Warm Neutrals and Layered Textures

Calmer color schemes centered on warm whites, muted greens, and soft greys create a soothing backdrop for family life. Layered textures—linen curtains, woven rugs, rattan baskets—add visual warmth and make the kitchen comfortable for lingering breakfasts and craft projects. Visually, texture prevents a neutral palette from feeling flat. Emotionally, these surfaces invite touch and create a sense of home. Start by painting walls in a warm white and introduce textiles in natural fibers. Place a washable rug near the sink and use open-front baskets to hold snacks and school supplies. The result keeps surfaces uncluttered while still allowing for the small chaos of daily routines.

Matte Black Fixtures with Natural Elements

Matte black hardware and faucets introduce contemporary contrast while keeping a grounded, sophisticated look when paired with organic materials. The dark accents provide visual punctuation that makes wood grains and stone surfaces pop. Emotionally, the balance between bold fixtures and softer natural elements can feel both modern and reassuring—perfect for a family that appreciates style without fuss. To apply this, replace cabinet pulls and the faucet with matte black finishes while keeping the rest of the palette warm. Choose antibacterial finishes where possible for busy households. Kids spill and parents wipe, so combining high-contrast hardware with forgiving surfaces gives you a kitchen that looks curated and still survives everyday life.

Open Shelving with Personal Displays

Open shelving showcases ceramics, family mugs, and cookbooks in a way that feels curated rather than cluttered when styled thoughtfully. Visually, it breaks up heavy cabinetry and creates breathing room; emotionally, displaying well-loved dishes offers a sense of identity and memory. To make open shelving work for a family, start with one wall and keep a mix of functional items and meaningful pieces—stacked plates, a child’s painted bowl, and a couple of framed recipe cards. Use consistent color families to avoid visual chaos and keep the most fragile items on higher shelves. Regularly rotate the display to incorporate kids’ artwork or seasonal finds, turning everyday storage into decorating inspiration that evolves with your family.

Conclusion

If you want more refreshing home décor ideas and practical styling examples that fit busy family life, check out Styling Her Life design ideas. Save a few of these concepts for your next weekend refresh, try one that feels manageable, and watch how small, nature-forward changes can transform both the look and the feel of your kitchen.

Categories
Christmas

Rustic DIY Christmas Tree Made of Crates with Natural Touches

Embrace Rustic Charm with a DIY Christmas Tree Made of Crates

As the air turns crisp and the days grow shorter, the holiday spirit begins to wrap around our home like a cozy quilt. There’s something magical about this season that always brings back fond memories of my own childhood. I remember my mom baking cookies while we stitched together handmade ornaments, and those early mornings filled with laughter and excitement as we unwrapped our decorations. Now, as a mom of two lively children, aged 8 and 12, I adore recreating those heartwarming traditions. My son’s keen eye for creativity and my daughter’s passion for crafting inspire new family projects each year. One tradition we’ve embraced is decorating with a rustic DIY Christmas tree made of crates, easy to assemble and perfect for filling our home with natural beauty.

Whether you have crates gathering dust in your garage or are eager to add a touch of rustic charm to your holiday decor, this DIY project is not only enjoyable but also brings everyone together. Let’s dig into the delightful world of rustic DIY Christmas trees, showcasing five inspiring ideas and tips that you can easily implement in your home this holiday season.

Choose Your Crates Wisely

The first step in our crafting adventure is selecting the right crates. You might find wooden crates at local farmers’ markets, thrift shops, or home improvement stores. Opt for a mix of sizes to create a tiered effect that adds depth and interest to your tree. My family often spends a Saturday perusing vintage shops, and we really enjoy the hunt for those perfect pieces. The character of older crates, with their weathered wood and unique stains, become a canvas for our holiday spirit.

As you gather your crates, think about how you can personalize each one. You can leave them in their natural state for a rustic look, or give them a quick sanding and a coat of paint to match your holiday palette. Consider using shades of forest green, deep red, or even metallics to create a warm and inviting feel. This not only sets a festive tone but also adds a cohesive theme to your holiday decorations.

Building the Base: Stacking and Securing

Once you have your crates sorted, it’s time to assemble your tree. Start by creating a sturdy base with the larger crates at the bottom and gradually stacking smaller ones on top. My husband often takes the lead with this physical aspect of our projects. He uses wood glue and screws to secure the crates together, ensuring that our creation won’t topple over amidst our excited decorating sessions.

To give the tree a bit more stability, you can secure it to the wall using brackets if you have curious little hands like mine. This way, you can relax and enjoy the moment without worrying about little mishaps during the festivities. The key here is to focus on balance and stability, making sure that each layer looks visually appealing while supporting the layer above.

Adding Natural Touches

What really makes your Christmas tree special are the personal touches, especially those inspired by nature. Look around your home and garden for branches, pinecones, and even dried fruits that can easily be incorporated into your design. Last year, my daughter and I collected fresh pine sprigs and attached them with twine to each crate. The fresh scent wafted through our living room, instantly lifting our spirits.

You can create a nature-inspired garland using small branches intertwined with some twinkling lights, or a simple string of dried oranges and cinnamon sticks for a lovely arrangement. Not only do these additions celebrate the rustic feel, but they also provide an opportunity to talk about sustainable decorating. Plus, your children will love helping out, creating memories just like the ones you cherish from your own childhood.

Decorating with Ornaments and Lights

After your tree’s frame is complete, it’s time to adorn it with ornaments and lights. I always encourage my children to get involved in crafting homemade ornaments. Using materials like felt, wood, and even upcycled items can create unique decorations representative of your family’s personality. Last year, we made glittery stars out of leftover cardboard, adding a personal touch that is hard to forget.

As for lighting, string lights can bring an inviting glow to your creation. You can wrap them around the crates or weave them through the branches you’ve added. My little ones love helping untangle the lights as we prepare to decorate; it often becomes a comedic ritual. The warm light reflects beautifully off the rustic wood, creating a cozy atmosphere perfect for family gatherings.

A Place for Memories

One of the most delightful aspects of our rustic DIY Christmas tree is its role in creating memories. Each crate can hold special items that tell our family’s holiday story. For instance, I like to place holiday cards we receive from family and friends in one of the lower crates, creating a living gallery of love and connection.

We also cherish our tradition of placing a special ornament that represents our year or highlights a significant family achievement. Last season, my son earned his first soccer trophy, and we made an ornament in its honor. This little practice of remembering past moments makes every Christmas tree installation a heartwarming affair, uniting our family across generations.

Conclusion: Your Turn to Create

As you gather your family for this exciting DIY project, remember that the true spirit of the holidays is about togetherness and creating memories that last a lifetime. A rustic Christmas tree made of crates not only enhances your holiday decor with a unique flair but also serves as a meaningful canvas where your family’s story unfolds each season. So gather those crates, embrace the natural beauty surrounding you, and let your creativity flourish.

This holiday season, as you assemble your tree, reflect on your favorite memories and look forward to new adventures with loved ones. Enjoy the laughter, the mess, and the warmth of being together. Happy crafting, and may your home be filled with joy, spirit, and the charm of a rustic holiday!