Categories
Christmas

DIY Christmas Silhouettes Tutorial with easy Templates

DIY Christmas Silhouettes Tutorial with Easy Templates

As the frost covers the ground and the scent of gingerbread wafts through the air, I find myself reminiscing about the Christmases of my childhood. Each year, my siblings and I would gather around the kitchen table, our hands sticky from cookie frosting, while our parents would decorate the house with twinkling lights and festive ornaments. Now, as a mom to two lively kids—Jack, who is 10 and constantly bursting with energy, and Lily, my creative little 8-year-old—I cherish those memories and love creating new ones together. One of our favorite traditions involves decorating our home with beautiful silhouettes that evoke the warmth and magic of the holiday season. It’s easy, fun, and a perfect way to add a personal touch to our holiday decor.

Gathering Your Supplies

Before diving into our DIY silhouettes, let’s make sure we are all set with the right materials. You will need:

  • Black cardstock or construction paper: This will serve as the base for your silhouettes.
  • Scissors or an Exacto knife: For cutting out your designs.
  • Templates: You can find various free templates online, but I also like to create my own from images of Christmas trees, reindeer, or snowflakes.
  • Glue stick or tape: For attaching your silhouettes to windows or walls.
  • White sheets of paper or backdrops: This will make your silhouettes pop!

Once you have everything ready, gather the kids around the kitchen table, and let’s unleash our creativity together!

Choosing the Right Templates

Selecting the perfect silhouette templates can truly set the mood for your decorations. Start by discussing with your kids what images resonate with them most during the holidays. Do they envision adorable reindeer dashing through the snow, a majestic Christmas tree adorned with ornaments, or playful snowmen? This is a great opportunity for everyone to share their ideas.

You can find lots of templates online to suit any theme, but I often encourage my children to sketch their desired shapes. Jack loves creating reindeer with big antlers, and Lily enjoys drawing whimsical snowflakes. Printing out templates or using their designs not only honors their creativity, but it also gives our decorations a personal touch that store-bought items lack.

Cutting Out the Silhouettes

Once you have your templates ready, it’s time for the most exciting part—cutting out the silhouettes! I usually lay down a cutting mat on the table so that we can work safely and without worry. As I guide my children through this step, I ensure they’re using the right tools for their age group.

For basic shapes, scissors work great, but for intricate designs, I recommend using an Exacto knife (with adult supervision). Take your time and encourage teamwork. Jack will often hold the template steady while Lily carefully cuts around the edges. This shared experience not only builds their skills but also fosters teamwork and patience.

If you accidentally make a mistake, don’t stress! The beauty of crafting is that it allows for creativity and mistakes can lead to unexpected ideas. Embrace those moments with laughter and good humor—it’s what makes the season memorable!

Displaying Your Artwork

With your silhouettes beautifully crafted, it’s time to showcase your hard work! I like to hang our silhouettes in various locations around the house. One of my favorite spots is the front window, where passersby can admire our creations during the evening when the lights shine through.

You can either use adhesive putty for easy removal or tape (which is a bit more permanent). If your silhouettes are lightweight enough, consider hanging them with fishing line to create a floating effect. As a family, we sometimes create a layered display by grouping different silhouettes together. Jack enjoys positioning them at different heights, which generates an engaging visual effect.

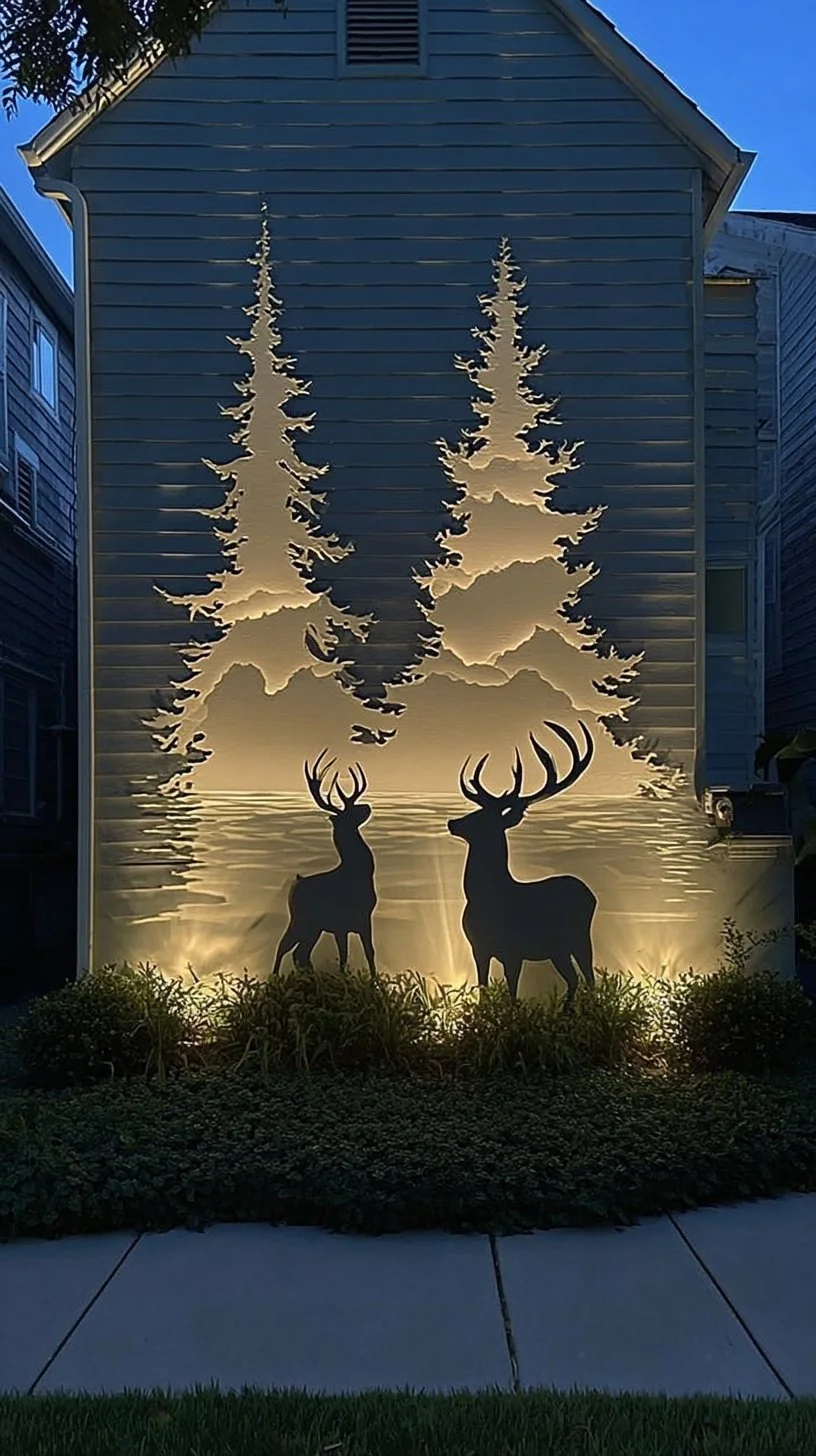
Another idea is to use a large wall or door as a canvas and create a winter wonderland scene. Using multiple silhouettes, we have recreated a snowy forest complete with trees, animals, and hanging snowflakes. It’s an ongoing project that grows with each year, adding a rich tapestry of memories and crafts.

Enhancing the Ambiance

Christmas silhouettes can transform your home’s ambiance into a cozy wonderland, and a few additional touches will elevate the effect. Fairy lights scattered throughout your display can add a magical glow, creating warmth during the long, cold winter nights.

One of the family traditions we’ve started is to incorporate aromatic elements into our holiday decor. Scented candles also play a role in making our home feel inviting. My husband often picks up cinnamon and pine-scented candles, so every corner smells like the essence of Christmas. A hot mug of cocoa in our hands while we admire our handiwork adds to the experience, creating perfect moments of togetherness.

You can even use your silhouettes in a tabletop display by placing them alongside festive ornaments or pinecones, which lend a natural touch. The more layered and varied your display, the more eye-catching it becomes!

Creating New Memories Together

As you gather around to craft your DIY Christmas silhouettes, seize the opportunity to create new memories with your loved ones. Share stories of your own childhood traditions, perhaps of similar crafts or favorites from your parents. Every cut and corner adds to the essence of your past while cherishing what you’re building together now.

Encourage your kids to think of each silhouette as a story waiting to be told. What does the reindeer represent? What memories do the snowflakes invoke? As they cut, they can think of their favorite holiday moments—maybe a trip to see the lights downtown or the holiday baking they did with Grandma.

The beauty of crafting is that it connects generations. As they work on their silhouettes, they are not just decorating; they are building a family legacy. One day, those same silhouettes may decorate their homes, carrying forth the warmth of family traditions.

Conclusion

The holiday season offers a beautiful canvas for creating memories and enhancing our homes with festive decor. By crafting DIY Christmas silhouettes, you not only add a personal touch to your home but also engage in meaningful moments with your loved ones. Embrace the creativity that flows in this season, and don’t hesitate to try new designs or ideas. Remember, it is not just about the final product—it’s about the laughter, stories, and love shared along the way. So gather your supplies, find those templates, and let your family’s creativity shine. Wishing you a warm, joyous, and beautifully decorated holiday season!

Categories
Christmas

Rustic DIY Christmas Tree Made of Crates with Natural Touches

Embrace Rustic Charm with a DIY Christmas Tree Made of Crates

As the air turns crisp and the days grow shorter, the holiday spirit begins to wrap around our home like a cozy quilt. There’s something magical about this season that always brings back fond memories of my own childhood. I remember my mom baking cookies while we stitched together handmade ornaments, and those early mornings filled with laughter and excitement as we unwrapped our decorations. Now, as a mom of two lively children, aged 8 and 12, I adore recreating those heartwarming traditions. My son’s keen eye for creativity and my daughter’s passion for crafting inspire new family projects each year. One tradition we’ve embraced is decorating with a rustic DIY Christmas tree made of crates, easy to assemble and perfect for filling our home with natural beauty.

Whether you have crates gathering dust in your garage or are eager to add a touch of rustic charm to your holiday decor, this DIY project is not only enjoyable but also brings everyone together. Let’s dig into the delightful world of rustic DIY Christmas trees, showcasing five inspiring ideas and tips that you can easily implement in your home this holiday season.

Choose Your Crates Wisely

The first step in our crafting adventure is selecting the right crates. You might find wooden crates at local farmers’ markets, thrift shops, or home improvement stores. Opt for a mix of sizes to create a tiered effect that adds depth and interest to your tree. My family often spends a Saturday perusing vintage shops, and we really enjoy the hunt for those perfect pieces. The character of older crates, with their weathered wood and unique stains, become a canvas for our holiday spirit.

As you gather your crates, think about how you can personalize each one. You can leave them in their natural state for a rustic look, or give them a quick sanding and a coat of paint to match your holiday palette. Consider using shades of forest green, deep red, or even metallics to create a warm and inviting feel. This not only sets a festive tone but also adds a cohesive theme to your holiday decorations.

Building the Base: Stacking and Securing

Once you have your crates sorted, it’s time to assemble your tree. Start by creating a sturdy base with the larger crates at the bottom and gradually stacking smaller ones on top. My husband often takes the lead with this physical aspect of our projects. He uses wood glue and screws to secure the crates together, ensuring that our creation won’t topple over amidst our excited decorating sessions.

To give the tree a bit more stability, you can secure it to the wall using brackets if you have curious little hands like mine. This way, you can relax and enjoy the moment without worrying about little mishaps during the festivities. The key here is to focus on balance and stability, making sure that each layer looks visually appealing while supporting the layer above.

Adding Natural Touches

What really makes your Christmas tree special are the personal touches, especially those inspired by nature. Look around your home and garden for branches, pinecones, and even dried fruits that can easily be incorporated into your design. Last year, my daughter and I collected fresh pine sprigs and attached them with twine to each crate. The fresh scent wafted through our living room, instantly lifting our spirits.

You can create a nature-inspired garland using small branches intertwined with some twinkling lights, or a simple string of dried oranges and cinnamon sticks for a lovely arrangement. Not only do these additions celebrate the rustic feel, but they also provide an opportunity to talk about sustainable decorating. Plus, your children will love helping out, creating memories just like the ones you cherish from your own childhood.

Decorating with Ornaments and Lights

After your tree’s frame is complete, it’s time to adorn it with ornaments and lights. I always encourage my children to get involved in crafting homemade ornaments. Using materials like felt, wood, and even upcycled items can create unique decorations representative of your family’s personality. Last year, we made glittery stars out of leftover cardboard, adding a personal touch that is hard to forget.

As for lighting, string lights can bring an inviting glow to your creation. You can wrap them around the crates or weave them through the branches you’ve added. My little ones love helping untangle the lights as we prepare to decorate; it often becomes a comedic ritual. The warm light reflects beautifully off the rustic wood, creating a cozy atmosphere perfect for family gatherings.

A Place for Memories

One of the most delightful aspects of our rustic DIY Christmas tree is its role in creating memories. Each crate can hold special items that tell our family’s holiday story. For instance, I like to place holiday cards we receive from family and friends in one of the lower crates, creating a living gallery of love and connection.

We also cherish our tradition of placing a special ornament that represents our year or highlights a significant family achievement. Last season, my son earned his first soccer trophy, and we made an ornament in its honor. This little practice of remembering past moments makes every Christmas tree installation a heartwarming affair, uniting our family across generations.

Conclusion: Your Turn to Create

As you gather your family for this exciting DIY project, remember that the true spirit of the holidays is about togetherness and creating memories that last a lifetime. A rustic Christmas tree made of crates not only enhances your holiday decor with a unique flair but also serves as a meaningful canvas where your family’s story unfolds each season. So gather those crates, embrace the natural beauty surrounding you, and let your creativity flourish.

This holiday season, as you assemble your tree, reflect on your favorite memories and look forward to new adventures with loved ones. Enjoy the laughter, the mess, and the warmth of being together. Happy crafting, and may your home be filled with joy, spirit, and the charm of a rustic holiday!

Categories
Christmas

5 Gorgeous Ceiling Christmas Decor Ideas to Lift Your Holiday Cheer

5 Stunning Ideas for Ceiling Christmas Decor to Elevate Your Holiday Spirit

As the chilly winds of December sweep through, our home transforms into a warm haven filled with laughter, holiday cheer, and the sweet fragrance of hot cocoa. I’m a proud mom of two energetic children, aged 8 and 12, and let me tell you, our house during Christmas is bursting with life. We have our little family traditions, like decorating the tree together while listening to classic carols. I often reminisce about my childhood memories spent at my parents’ cozy home, where we’d hang glittering ornaments and string popcorn garlands. This year, however, I decided it was time to take our holiday spirit to new heights—quite literally!

Ceiling decorations can dramatically influence the holiday ambiance and create a wonderland for my kids and their friends. Here are five delightful ideas that can easily transform your ceilings into stunning displays, filling your home with warmth and festive inspiration this season.

1. Whimsical Hanging Ornaments

One of the easiest ways to bring festive energy into your home is by creating a whimsical display of hanging ornaments from your ceiling. You can use lightweight ornaments, nimble paper snowflakes, or even homemade crafts created by your little ones. Start by selecting a few colors that represent your holiday style, such as red, gold, and green, or go for a frosty theme with silver and blue.

To create a striking display, tie varying lengths of clear fish lines to your ornaments, allowing them to dangle gracefully. Take your pier a step further by clustering them over key areas, like the dining table or in front of a window. This not only creates a focal point but also adds a delightful touch of enchantment that captures the excitement of the holidays. My children love hearing the stories behind each ornament; it’s a wonderful way to keep the spirit alive from generation to generation.

2. Festive Paper Lanterns

Elevate your home styling with charming paper lanterns that cast a warm glow in your space. This idea is a personal favorite of mine—simple to create and lovely to look at. Gather your supplies: colored kraft paper, scissors, and a few LED tea lights for safety.

You can cut the paper into various shapes, from stars to snowflakes, and fold them accordingly to form lanterns. Brilliantly colored lanterns can be hung from your ceiling using string or ribbons. Imagine the warm glow that fills the room as the lanterns sway gently. Invite the kids to help decorate and personalize each lantern with their own designs. Not only will this get them involved in the decorating process, but it also creates treasured memories as they watch the festive lighting come to life.

3. Enchanting Garland Displays

Garlands are a classic decoration, but did you know they can work wonders overhead too? This year, I decided to create a whimsical garland display that adds an unexpected twist to our traditional Holiday decor. Choose between fresh evergreen branches, or make it a fun craft project by using craft paper, ribbons, or even beads to create a festive garland.

Once you’ve crafted your garland, consider draping it across the ceiling. I like to intertwine twinkling fairy lights within the garland for a magical effect. This creates a beautiful visual, especially at night! My kids enjoyed discovering new ways to add personal touches to the garland—whether it was stringing popcorn or even adding cinnamon sticks for that delicious holiday aroma.

4. Draped Tulle for a Dreamy Canopy

For those who want to create a dreamy atmosphere, consider draping tulle or soft fabric across your ceilings. It gives the illusion of an ethereal canopy, diving right into the realm of holiday magic. I recall my mother draping fluffy fabrics across our own ceilings when I was young—it truly felt like stepping into a winter wonderland!

You can choose white for a classic look or get creative with shimmery metallics for a more glamorous feel. Start at one corner of the room and let the fabric flow down in gentle waves, securing it with pins or tape. Light up the tulle by placing small LED lights along the draped fabric for a soft glow. This isn’t just decoration; it’s an experience that your family and guests will remember fondly.

5. DIY Snowflakes from the Sky

Want to bring a magical snowfall indoors? Try creating DIY snowflakes to hang from your ceiling. It’s an affordable and fun way to add a touch of winter wonder to your holiday decorations! With some plain white paper, scissors, and string, you can easily create snowflakes of various shapes and designs.

Once you’ve cut out your snowflakes, hang them from the ceiling at different heights for a blizzard effect. My children and I had an absolute blast making snowflakes together on a snowy afternoon. Not only did we enjoy some quality craft time, but once these beauties were hanging, they brightened our rooms with a festive sparkle. To make it even more engaging, you can sprinkle biodegradable glitter or make gentle snowfall using cotton balls or faux snow for an added wintry effect!

Conclusion

Elevating your holiday spirit doesn’t have to be limited to traditional decorations around the house. By exploring the creative possibilities of ceiling decor, you can transform your living space into a breathtaking winter wonderland. These fun projects not only beautify your home but also encourage family bonding over crafts and creativity.

So gather your loved ones, unleash your inner holiday decorator, and let your ceilings sing with the spirit of the season. Whether you decide to adorn your ceiling with whimsical ornaments or dreamy fabric drapes, remember that the most important part of the holidays is the joy of creating meaningful memories together. Happy decorating!

Categories
Christmas

Transform Your Front Porch with Stunning DIY Christmas Planters – The Garden Style

Transform Your Front Porch with Stunning DIY Christmas Planters

As the crisp air settles in and the scent of cinnamon begins wafting through the neighborhood, my front porch transforms into a stage for festive cheer. Each year, I look forward to the Christmas season when I can spend time with my children, Emily and Jake, gathering twinkling lights, ornaments, and, of course, the perfect plantings for our seasonal decor. It has become a cherished family tradition to craft eye-catching planters, giving our home a warm and inviting focal point for all who pass by. Throughout our project, we weave in memories from my own childhood, sharing stories of my parents and the holiday wonders we created together. Join me in discovering fun, practical ways to elevate your own front porch with stunning DIY Christmas planters that celebrate the season’s spirit.

Embrace Natural Elements for a Cozy Feel

One of the simplest yet most effective trends for Christmas planters is to incorporate natural elements. Think pinecones, twigs, and evergreen branches. Not only do these materials bring a rustic charm, but they also evoke memories of long strolls through snowy woods. Last year, we took a family walk in a nearby park, collecting an assortment of pinecones and fragrant cedar while chatting about our favorite holiday traditions. Using a sturdy planter, I layered fresh greenery like noble fir or juniper as the base.

To add pizazz, we took our collection of pinecones and glued on a sprinkle of glitter. After securing them with hot glue, we nestled the cones among the greens. For a final touch, we added a red ribbon to the planter, tying it all together with the joyous spirit of the season. This DIY project not only beautifies your porch but also creates lasting memories with your family.

Delight with Festive Color Schemes

Color is undeniably one of the easiest ways to set a festive tone. In our household, we’ve always been fans of the classic red and green palette, reminiscent of my grandmother’s joyous decorations. Yet, modern trends encourage experimenting with unexpected combinations. This year, we decided to try a winter white and silver theme that spoke to the elegance of seasonal decor.

Start by selecting a classic pot that complements your home’s aesthetics. We used a graceful white ceramic planter, which lends a streamlined look. To achieve the color scheme, we layered white snow-covered branches with shimmering silver ornaments strategically placed. To add depth, I wrapped some faux fur around the base, encapsulating the feeling of coziness. Each time I step outside, the glimmer catches my eye, and it truly feels like magic.

DIY Accents Using Everyday Items

If you’re anything like me, you enjoy the thrill of repurposing items from around the house—or the garage—to create something beautiful. We decided to use old mason jars this year. While they’re often used for canning, they can also be exceptional accents in your planters.

We filled the jars with fairy lights and placed them on the sides of the planter, creating a soft glow at night. Inside the main planter, we combined classic red berries with evergreen greens for that joyful contrast. I involved my children in painting the jars with frosted spray paint, which they loved, adding their personal flair to our holiday decor. It’s satisfying to see our unique creations on display, bringing smiles to our neighbors and inviting them in.

Seasonal Scents to Enchant Your Porch

A well-decorated porch does more than please the eyes; it tantalizes the nose as well. One of my fondest wishes during the holidays is to create an aromatic paradise where every guest feels welcomed. You can easily infuse delightful scents into your Christmas planters using aromatic herbs and spices.

Consider filling your planters with herbs like rosemary, thyme, and mint. These not only look stunning but also carry festive scents that enhance the atmosphere. Another tip? Add orange slices or cinnamon sticks around the base of the planter for an extra dash of fragrance. Last year, we even experimented with placing scented candles in the middle, which nicely illuminated our evening gatherings. The aroma wafting through the air became a hallmark of our holiday season.

Layering Textures for Visual Interest

Another crucial design strategy for your DIY Christmas planters is the art of layering. By combining various textures, you create a stunning visual experience. This year, our adventure began as we rummaged through old quilts and throw pillows to find cozy textures for our planters.

I layered a bed of bark mulch at the base, following it with moss and topped that with vibrant poinsettias. The contrast of colors and textures is captivating! We even dug around for sturdy sticks and cut them into varied lengths, painting them gold for a whimsical touch. When the planters are displayed side by side on our porch, they tell a heartwarming story—one filled with nature and creativity, much like the celebrations we cherish as a family.

Gather Neighbors for a Porch Decorating Challenge

Lastly, what better way to infuse holiday spirit into your community than through a friendly decorating challenge? Invite neighbors to get involved and boost the festive energy in your surrounding area. Last holiday season, we hosted a porch decorating contest among our neighbors, gathering for an evening of laughter, holiday treats, and inspiration.

As part of the challenge, everyone created unique Christmas planters to display. It was a delightful way to bond and spark creativity in each household. There was a sense of pride as we walked through the neighborhood, admiring each other’s handiwork, and it warmed my heart to see everyone pour their personality into their decorations.

Conclusion

As this enchanting season approaches, I invite you to embark on this journey of creativity, family bonding, and community spirit by transforming your front porch into a festive haven with stunning DIY Christmas planters. Whether it’s layering textures, exploring diverse color palettes, or using natural elements, these projects are bound to bring joy and warmth to your home. So gather your loved ones, get crafting, and celebrate the season together. The smiles, laughter, and memories you create will be the greatest decorations of all. Happy holidays!

Categories
DIY

Paper Christmas Tree Craft

As the holiday season draws near, our home transforms into a wonderland of twinkling lights, fragrant pine, and the laughter of my children, Emily and Jack, as they help with the decorations. My heart swells with warmth as we unwrap cherished ornaments passed down from my parents, each carrying a story of its own. Those moments spent together, crafting memories and engaging in festive activities, are what make this season truly special. Just the other day, we stumbled upon a fun yet simple craft idea that I couldn’t wait to share: creating paper Christmas trees! Now, you might be wondering how a simple piece of paper can bring the spirit of the holidays to life, but trust me, it can. So, grab your scissors and glue, and let’s explore this delightful craft journey together.

Why Create Paper Christmas Trees?

Before we dive into the crafts, let’s consider why paper Christmas trees have become such a delightful trend in seasonal decor. First and foremost, they are incredibly versatile. You can customize them to fit any color scheme or theme in your home. This year, my kids and I have chosen a silver and blue palette that mirrors the frosty charm of winter, but you can go with traditional green or any whimsical color you desire.

Moreover, making these trees is a fantastic way to engage children in crafting. Both Emily and Jack love getting their hands sticky with glue and paints, and I cherish the creativity they unleash during the process. Lastly, crafting these trees doesn’t break the bank! It’s an affordable way to incorporate festive decor without overspending, giving you more room to enjoy other seasonal splurges.

Gathering Your Supplies

Now that you’re excited about this project, let’s talk about supplies. The best part? You probably already have most of what you need at home! Here’s a list that will get you started:

  1. Paper: You can use colored construction paper, old greeting cards, or even wrapping paper scraps.
  2. Scissors: Ensure they’re kid-friendly if your little ones are helping out.
  3. Glue or Tape: White school glue works well for paper trees, but double-sided tape can be beneficial for quicker assembly.
  4. Decorative Items: Think glitter, buttons, beads, or sequins for added sparkle. Our favorite? Using up leftover craft items from previous projects!
  5. A Base: You might want to glue your finished trees onto a sturdy paper base or a small piece of cardboard so that they stand tall.

Get your supplies together, and set up a cozy crafting area in your home. Perhaps put on some festive music or a holiday movie to get everyone in the mood.

Crafting the Paper Trees

Alright, let’s jump into the fun part—making those paper trees! Here’s a simple step-by-step guide to help you create your own.

  1. Cut out the Paper: Start by cutting your paper into various sizes of triangles. My kids love experimenting with different heights and widths for a fun visual effect.
  2. Assemble the Tree Shape: Take the largest triangle and lay it flat. Then, glue smaller triangles on top, layering them to form a tree. You can even use a circular piece of paper at the bottom to act as the tree trunk!
  3. Add Decorations: Here comes the fun part! Let your children unleash their artistic flair by adding decorations. They can sprinkle glitter, stick on beads, or even draw on their designs with markers.
  4. Final Touches: Once the glue has dried, consider adding a festive star on top. A simple yellow paper star cutout can bring a touch of magic.
  5. Display Your Creations: From your dining table to your living room mantle, there are countless ways to showcase your paper creations around your home.

Watching Emily and Jack put their unique spin on each tree is what keeps this tradition alive and wonderful. Who knew empty paper could transform into such a vibrant part of our holiday decor?

Personalizing Your Tree

One of the delightful aspects of creating paper Christmas trees is the opportunity for personalization. In our home, we love to incorporate elements that reflect our family’s personality. This year, we decided to make each tree tell a story.

For Jack, we included buttons and Lego pieces, showcasing his love for building and play. For Emily, we created a pastel-themed tree adorned with intricate doodles and drawings of our family’s favorite winter scenes.

Encourage your children to think about what represents them the best, be it their favorite colors, hobbies, or memories. This touch of personalization adds meaning to their creations and truly brings the spirit of the season into your home.

Expanding the Craft: Tree Variations

If you’re like me and enjoy shaking things up, consider trying out different variations of paper trees. Here are a few inspiring ideas:

  1. 3D Paper Trees: For a more advanced project, cut multiple layers of triangles and fold them outward to create a three-dimensional tree. Kids love seeing these come to life!
  2. Mixed-Media Trees: Combine paper with recycled materials like fabric, old magazines, or even those leftover Christmas cards. This can lead to some truly unique designs.
  3. Themed Trees: Adjust your trees to suit any theme—think of a beach-themed tree adorned with shells for a quirky twist or holiday trees inspired by famous book characters. Imagination knows no bounds!

As we decorated our themed trees with little cut-outs from last year’s holiday greeting cards, Emily gleefully exclaimed, “Look, Mom! The Grinch is on my tree!” You could just feel the festive spirit multiplying!

Displaying Your Crafty Masterpieces

Once you have a mini forest of paper Christmas trees ready, you must think about how to display them. Here are tips on showcasing your festive labor of love:

  • Centerpiece: Arrange your trees on a tray as a centerpiece for your holiday dining table. Place soft white lights around them for that extra cozy touch.
  • Mantle Magic: Place your creations on the fireplace mantle. We like to mix them in with our string lights and seasonal garlands for added visual interest.
  • Window Display: Transform your window sill into a winter wonderland with these charming trees, making it a delight for both inside and outside viewers.

Crafting a warm and inviting atmosphere in your home is what the holidays are all about. Each time I glance at our adorned mantle, I’m reminded of the joyful moments we shared during our crafting sessions.

Final Thoughts

The holiday season beckons us to embrace creativity, warmth, and togetherness. Engaging in this paper Christmas tree craft is not just about decorating your home; it’s about spending quality time with family and creating memories that will last a lifetime. Whether you choose to go with traditional designs or opt for whimsical themes, the joy of crafting together will resonate long after the decorations are taken down.

So, gather your supplies, unleash your kids’ creativity, and enjoy making paper Christmas trees that reflect your family’s unique style. I promise it will become a cherished tradition in your home, just as it has in ours! Happy crafting!

Categories
Christmas

6 Cozy Christmas Decoration Trends to Transform Your Home

Magical Christmas Decoration Ideas: Embrace the Warmth of the Holidays

As the days grow significantly shorter and the crisp chill of winter firmly settles in, a unique sense of anticipation begins to build. There is something undeniably magical about transforming your everyday living space into a cozy, glittering wonderland. This is not just the season of winter; it is the season of Advent, joyful gatherings, twinkling lights, and heartfelt celebrations.

For many, the ritual of unpacking ornaments and stringing up lights is as important as the day itself. If you are looking to elevate your home styling with a seasonal design that reflects the true spirit of the holidays, you have come to the right place. Whether you prefer a traditional look or a modern aesthetic, the right Christmas decoration can turn any house into a home filled with festive cheer. Let’s explore some of the most delightful trends and detailed practical tips that will make your home both inviting and spectacularly festive this winter.

1. Nature-Inspired Christmas Decoration

One of the most enchanting and enduring trends this season is drawing inspiration directly from the winter landscape. Bringing the outdoors in creates a connection to the earth and grounds the often-hectic holiday season in something serene and rustic. Incorporating raw elements such as pinecones, birch branches, holly, and evergreen boughs can create a woodland vibe that feels authentic and timeless.

Tips to Implement:

  • Wreaths and Garlands: Go beyond the standard store-bought plastic. Craft your own door wreath using fresh pine, cedar, or eucalyptus for a scent that greets guests before they even enter. Inside, drape heavy garlands of real greenery along your mantelpiece or wind them up the staircase banister. Intertwine them with velvet ribbons or dried orange slices for a classic Victorian Christmas decoration feel.

  • Natural Centerpieces: Create a focal point for your dining table by filling a rustic wooden dough bowl with oversized pinecones, walnuts, and seasonal fruits like pomegranates or stud oranges with cloves (pomanders). This not only looks beautiful but adds a spicy, citrusy aroma to the room that screams Christmas.

2. Cozy Textiles and Layers

Nothing says warmth like layers of soft, plush textiles. During the holidays, the tactile experience of your home is just as important as the visual one. This year, the home decor trend emphasizes bringing extreme comfort to your living spaces through sumptuous fabrics, ensuring every corner invites you to snuggle up with a cup of hot cocoa and a holiday movie.

Tips to Implement:

  • Seasonal Throws and Pillows: Swap out your lightweight cottons for heavy, chunky knits, faux fur, or velvet throws on your sofas and armchairs. Look for cushion covers that feature subtle holiday motifs—like reindeer silhouettes, snowflakes, or classic tartan plaids. This switch instantly changes the mood of the room to “festive mode” without requiring a complete furniture overhaul.

  • Layered Rugs and Tree Skirts: Don’t forget the floor! Consider layering rugs—place a soft sheepskin or a fuzzy white area rug over a larger, natural fiber rug to create visual depth and warmth underfoot. Additionally, treat your Christmas tree skirt as a major textile moment; opt for a thick, faux-fur skirt or a hand-knitted wool collar to hide the tree stand elegantly.

3. Festive Color Palettes

While traditional reds and forest greens will always hold a nostalgic place in Christmas decoration, this season sees a sophisticated shift towards more unexpected and elegant color combinations. Jewel tones like deep emeralds, rich ambers, rubies, and midnight blues are gaining massive popularity, adding a regal touch to holiday interiors.

Tips to Implement:

  • Accent Pieces: Infuse your chosen color palette through specific decor items like throw pillows, ceramic vases, and artwork. If you love the “Midnight Winter” look, opt for deep blue velvet ribbons on your tree paired with silver and gold ornaments. These jewel tones catch the light beautifully and create a vibrant, luxurious focal point in your rooms.

  • Dinnerware and Table Settings: Your holiday table is a canvas. Update your setting with colorful charger plates, colored glassware, or linen napkins that reflect these trendy hues. A runner in a deep burgundy or emerald green can anchor the table, allowing your china and sparkling cutlery to pop against the rich background.

4. Minimalistic and Eco-Friendly Decor

A growing trend in the world of Christmas decoration is embracing eco-friendly choices and minimalistic designs, often inspired by Scandinavian “Hygge.” This approach focuses on quality over quantity. Instead of overwhelming your space with boxes of plastic tinsel, the goal is to choose a few meaningful, sustainable pieces that evoke joy, mindfulness, and peace.

Tips to Implement:

  • Sustainable Choices: Opt for decorations made of natural, biodegradable materials or upcycled items. Think candle holders made from reclaimed wood, paper stars suspended from the ceiling, or ornaments crafted from recycled glass or felt. Wrapping gifts in reusable fabric (Furoshiki style) or brown kraft paper with real sprigs of rosemary is a chic, earth-friendly alternative to glossy, non-recyclable paper.

  • Curated Focal Points: Instead of covering every surface, create a captivating display with just a few well-chosen seasonal items. A single, stunning Christmas tree with white lights and wooden ornaments, or a beautifully arranged nativity scene on a side table, allows each piece to shine and reduces visual clutter.

5. Warm Lighting Solutions

As daylight dwindles in the late afternoon, the importance of lighting cannot be overstated. The right lighting is the heartbeat of Christmas decoration; it sets the cozy mood and enhances the beauty of every ornament and sprig of holly. Harsh overhead lighting should be avoided in favor of warm, ambient glows.

Tips to Implement:

  • Fairy Lights Everywhere: Don’t limit lights to just the tree. Drape warm-white fairy lights around windows, woven into garlands on the mantel, or coiled inside glass apothecary jars for a magical “firefly” glow. Copper wire lights are particularly effective as the wire disappears, leaving only the specks of light.

  • Candles and Lanterns: Use an assortment of candles—pillar, votive, or tealights—in varying heights and widths to create depth. Grouping them on a mirrored tray amplifies their glow. For safety, especially near the tree or with pets around, high-quality LED candles with a flickering flame effect are a fantastic alternative that maintains the ambiance without the fire risk.

6. Creative Holiday Displays

Showcasing your holiday spirit can be done through creative displays that spark joy and nostalgia. This is your opportunity to highlight your personal style, family history, and cherished traditions through your Christmas decoration. It is about telling a story through objects.

Tips to Implement:

  • Personalized Ornaments: Create a DIY ornament-making station with family and friends. Use materials like salt dough, felt, or wood slices to create custom ornaments that represent specific family memories from the past year. These handmade treasures often become more valuable than the most expensive glass bauble.

  • The Nostalgia Wall: Dedicate a wall, a hallway console, or a shelf to a photo collage of past holidays. Frame photos of visits to Santa, old family gatherings, or snowy days from your childhood. Intersperse these photos with vintage Christmas cards or heirlooms. This reminds everyone of the treasured moments and the true essence of togetherness that defines the season.

Conclusion

Transforming your home into a winter wonderland filled with delightful seasonal decor is not only a fun creative project but also a perfect way to spread joy and warmth during the colder months. Whether you choose to embrace nature with fresh greens, layer up with cozy textiles, experiment with bold jewel tones, commit to eco-friendly choices, master the art of warm lighting, or curate creative personal displays, each element plays a vital role.

The goal of Christmas decoration is not perfection, but rather creating an atmosphere where memories can be made. So, grab your decorating supplies, put on your favorite holiday playlist, and start turning your home into a festive retreat that you and your loved ones will cherish. Happy decorating!