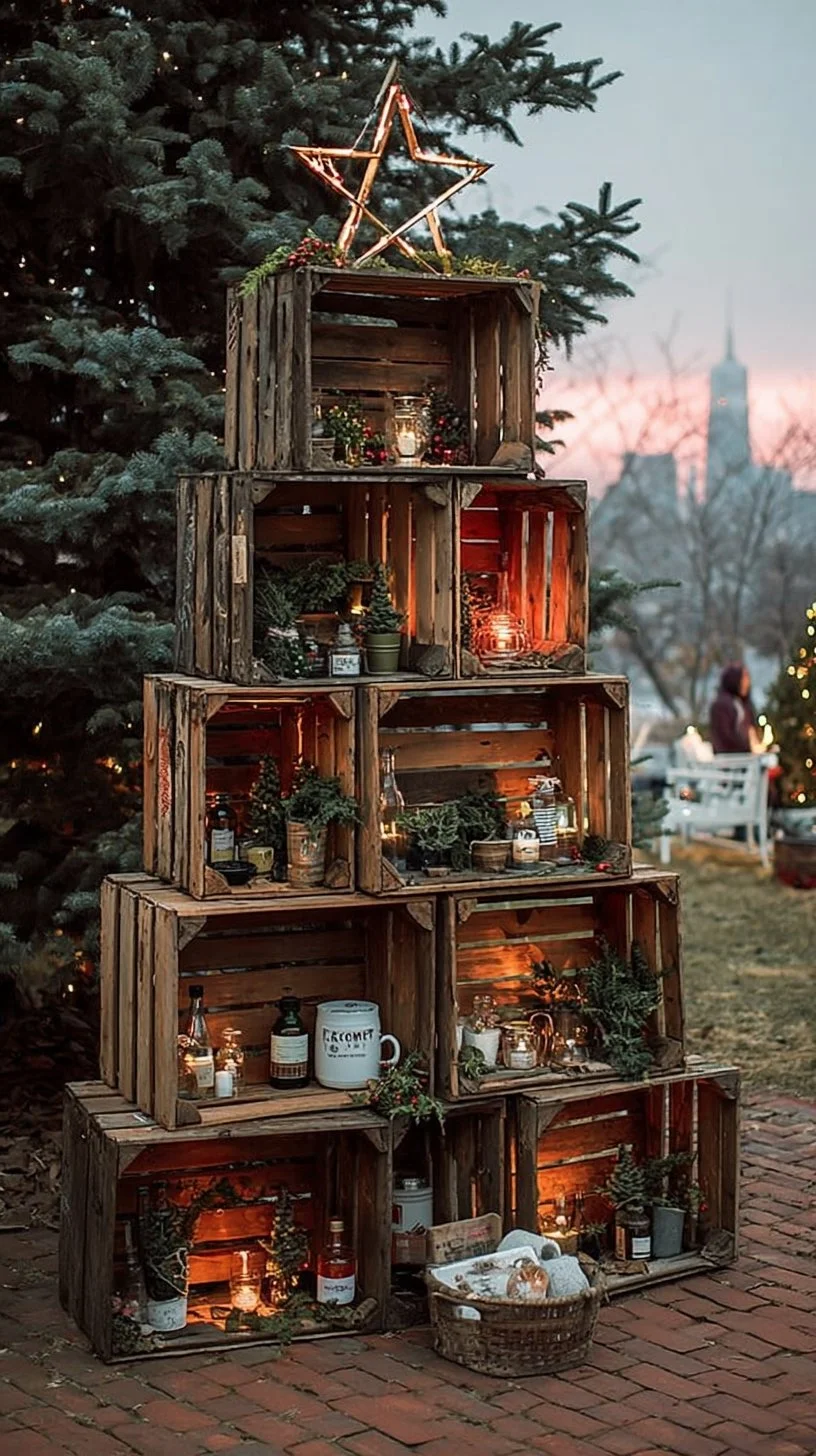
Embrace Rustic Charm with a DIY Christmas Tree Made of Crates
As the air turns crisp and the days grow shorter, the holiday spirit begins to wrap around our home like a cozy quilt. There’s something magical about this season that always brings back fond memories of my own childhood. I remember my mom baking cookies while we stitched together handmade ornaments, and those early mornings filled with laughter and excitement as we unwrapped our decorations. Now, as a mom of two lively children, aged 8 and 12, I adore recreating those heartwarming traditions. My son’s keen eye for creativity and my daughter’s passion for crafting inspire new family projects each year. One tradition we’ve embraced is decorating with a rustic DIY Christmas tree made of crates, easy to assemble and perfect for filling our home with natural beauty.
Whether you have crates gathering dust in your garage or are eager to add a touch of rustic charm to your holiday decor, this DIY project is not only enjoyable but also brings everyone together. Let’s dig into the delightful world of rustic DIY Christmas trees, showcasing five inspiring ideas and tips that you can easily implement in your home this holiday season.
Choose Your Crates Wisely
The first step in our crafting adventure is selecting the right crates. You might find wooden crates at local farmers’ markets, thrift shops, or home improvement stores. Opt for a mix of sizes to create a tiered effect that adds depth and interest to your tree. My family often spends a Saturday perusing vintage shops, and we really enjoy the hunt for those perfect pieces. The character of older crates, with their weathered wood and unique stains, become a canvas for our holiday spirit.
As you gather your crates, think about how you can personalize each one. You can leave them in their natural state for a rustic look, or give them a quick sanding and a coat of paint to match your holiday palette. Consider using shades of forest green, deep red, or even metallics to create a warm and inviting feel. This not only sets a festive tone but also adds a cohesive theme to your holiday decorations.
Building the Base: Stacking and Securing
Once you have your crates sorted, it’s time to assemble your tree. Start by creating a sturdy base with the larger crates at the bottom and gradually stacking smaller ones on top. My husband often takes the lead with this physical aspect of our projects. He uses wood glue and screws to secure the crates together, ensuring that our creation won’t topple over amidst our excited decorating sessions.
To give the tree a bit more stability, you can secure it to the wall using brackets if you have curious little hands like mine. This way, you can relax and enjoy the moment without worrying about little mishaps during the festivities. The key here is to focus on balance and stability, making sure that each layer looks visually appealing while supporting the layer above.
Adding Natural Touches
What really makes your Christmas tree special are the personal touches, especially those inspired by nature. Look around your home and garden for branches, pinecones, and even dried fruits that can easily be incorporated into your design. Last year, my daughter and I collected fresh pine sprigs and attached them with twine to each crate. The fresh scent wafted through our living room, instantly lifting our spirits.
You can create a nature-inspired garland using small branches intertwined with some twinkling lights, or a simple string of dried oranges and cinnamon sticks for a lovely arrangement. Not only do these additions celebrate the rustic feel, but they also provide an opportunity to talk about sustainable decorating. Plus, your children will love helping out, creating memories just like the ones you cherish from your own childhood.
Decorating with Ornaments and Lights
After your tree’s frame is complete, it’s time to adorn it with ornaments and lights. I always encourage my children to get involved in crafting homemade ornaments. Using materials like felt, wood, and even upcycled items can create unique decorations representative of your family’s personality. Last year, we made glittery stars out of leftover cardboard, adding a personal touch that is hard to forget.
As for lighting, string lights can bring an inviting glow to your creation. You can wrap them around the crates or weave them through the branches you’ve added. My little ones love helping untangle the lights as we prepare to decorate; it often becomes a comedic ritual. The warm light reflects beautifully off the rustic wood, creating a cozy atmosphere perfect for family gatherings.
A Place for Memories
One of the most delightful aspects of our rustic DIY Christmas tree is its role in creating memories. Each crate can hold special items that tell our family’s holiday story. For instance, I like to place holiday cards we receive from family and friends in one of the lower crates, creating a living gallery of love and connection.
We also cherish our tradition of placing a special ornament that represents our year or highlights a significant family achievement. Last season, my son earned his first soccer trophy, and we made an ornament in its honor. This little practice of remembering past moments makes every Christmas tree installation a heartwarming affair, uniting our family across generations.
Conclusion: Your Turn to Create
As you gather your family for this exciting DIY project, remember that the true spirit of the holidays is about togetherness and creating memories that last a lifetime. A rustic Christmas tree made of crates not only enhances your holiday decor with a unique flair but also serves as a meaningful canvas where your family’s story unfolds each season. So gather those crates, embrace the natural beauty surrounding you, and let your creativity flourish.
This holiday season, as you assemble your tree, reflect on your favorite memories and look forward to new adventures with loved ones. Enjoy the laughter, the mess, and the warmth of being together. Happy crafting, and may your home be filled with joy, spirit, and the charm of a rustic holiday!