I used to juggle carpools, piano practice, and a hundred tiny emergencies while balancing a mug of coffee on the counter that always seemed to attract crumbs. As a mom in my forties with two kids between eight and twelve, my kitchen is where homework meets dinner and where neighbors pop in to borrow sugar. I remember the afternoon my daughter drew a tiny sun on the back of a wooden board while I chopped herbs; that little mark somehow turned an ordinary utensil into a keepsake. Those everyday moments made me rethink practical decor. I wanted something warm, simple to update, and sturdy enough for family life. That’s how a pared-back approach to styling cutting boards on the wall became a weekend project that felt personal, useful, and oddly soothing—an easy way to refresh the heart of the home with real life in mind.
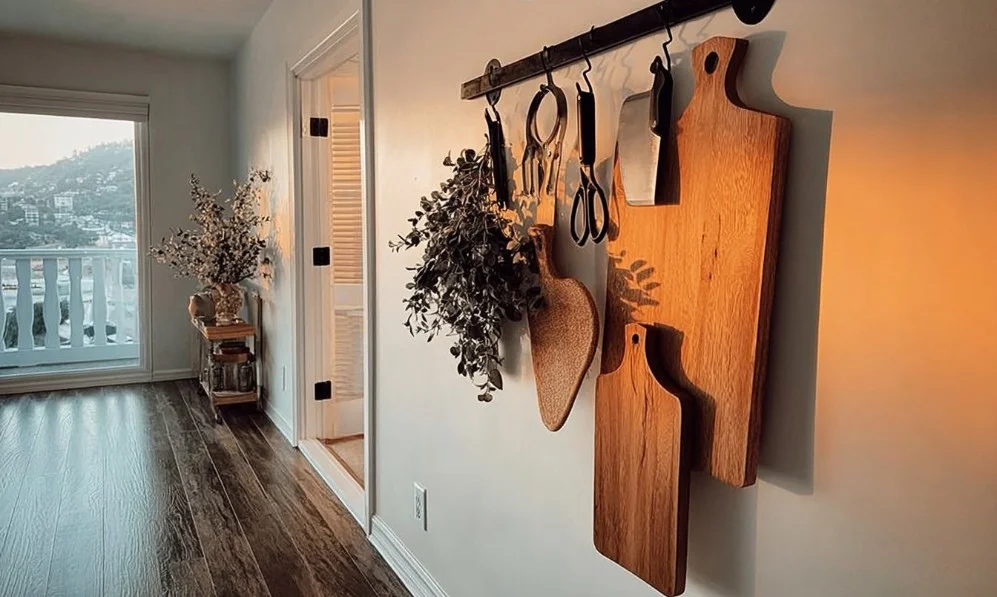
Layered Wood Focal Display
A clustered, layered arrangement of boards turns functional pieces into a focal artwork that feels collected, not staged. Visually, different shapes and grain patterns create movement and warmth, pulling the eye without overwhelming the room. Emotionally, a mix of heirloom boards and inexpensive finds reads like a family story, which resonates when friends and neighbors stop by for a casual visit. To recreate this, start with a simple grid or asymmetric cluster above your counter or sink. Use small picture hooks or french cleats for heavier pieces and vary orientations for interest. Let a child’s carved initials or a souvenir board sit among them to make the display feel lived-in. This approach works as a home décor idea because it blends utility with memory while staying easy to change as tastes evolve.
Functional Gallery Over Prep Area
Turning the wall above your main prep zone into a gallery makes tools both beautiful and accessible. This is an interior styling tip that bridges form and function: boards hang like art but are within reach for quick slicing during homework-time dinners. Visually, aligning boards of similar tones creates cohesion; emotionally, having everything in plain sight cuts down on frantic searches when your youngest asks for a snack right before soccer practice. Install a shallow rail or a row of pegs at a comfortable height so kids can grab a board when setting out snacks. Keep heavier or oil-treated boards lower and lighter ones higher. This layout supports busy family routines and shows that decorating inspiration can be practical without losing personality.
Mix Textures with Floating Shelves
Combining floating shelves and cutting boards adds dimension and lets you layer plants, cookbooks, and small framed photos alongside your boards. The interplay of wood, ceramic, and greenery refreshes the wall and softens the kitchen’s workwear look. This technique works because it creates vignettes that feel curated but still usable; emotionally, it signals hospitality and warmth when you invite neighbors over for coffee. To implement, install a couple of staggered shelves and lean boards behind potted herbs or a vintage mug collection. Allow a child’s favorite cup or a postcard from a family trip to peek through. The result is a cozy, functional corner that blends interior styling tips with the rhythm of everyday life.
Cozy Breakfast Nook Accent
Smaller boards make perfect accents around a breakfast nook, framing a chalkboard menu or a family photo wall. Their natural hues warm up the space and complement soft textiles, making morning routines feel gentler. This decorating inspiration is especially useful when you want to create a spot that invites lingering over cereal or a quick craft project. Arrange boards in a loose row or scatter a few above the bench for a casual look. Include a shallow ledge for napkins and kids’ art to make the area practical for breakfast and homework. This small update refreshes a high-use corner and helps transform rushed mornings into moments with a little more grace.
Seasonal Swap and Personalization
One of the best parts of a cutting board wall is how easy it is to update. Rotate boards by season, swap in a painted board for holidays, or let the kids personalize one each year with washable paint or wood-safe markers. Visually, rotating pieces keeps the wall dynamic; emotionally, it becomes a living scrapbook of family life. To do this, store extra boards in a lower cabinet labeled for swap-outs and dedicate one spot on the wall for new additions. Teach your children to oil a board as a mini chore; it becomes a ritual that connects them to the space. This method combines simple maintenance with decorating inspiration and ensures the display stays fresh and meaningful.
DIY Finishes and Kid-Safe Options
Finishing boards with food-safe oils or beeswax keeps them looking great and safe for family use. Choosing easy, non-toxic finishes not only preserves wood but also invites kids to help with after-dinner care—an interior styling tip that doubles as skill-building. Visually, a well-oiled board pops with color and grain, adding a handcrafted feel to your décor. For a kid-friendly approach, use lighter woods for the lower hooks and reserve the top row for decorative or seldom-used pieces. Keep a small care kit in a drawer so your children can lend a hand on weekend refreshes. Simple DIY touch-ups make the wall durable, teach responsibility, and keep your kitchen both pretty and practical.
Conclusion
If you need a small weekend project that blends style and function, a thoughtfully arranged cutting board wall can change the look of your kitchen while fitting into real family life. Save the ideas that speak to you, let the kids add their marks, and treat the wall as a rotating gallery that grows with your family. For a detailed, step-by-step guide to making this kind of display yourself, check out this step-by-step cutting board wall tutorial and adapt the tips to suit your space. Come back later to swap pieces, try a new layout, or share what your family adds next.